1. How to Insert Picture
Insert clip art
- On the Insert tab, in the Illustrations group, click Clip Art.

- In the Clip Art task pane, in the Search for text box, type a word or phrase that describes the clip art that you want, or type in all or some of the file name of the clip art.
- To narrow your search, do one or both of the following:
- To limit the search results to a specific collection of clip art, in the Search in box, click the arrow and select the collection you want to search.
- To limit the search results to clip art, click the arrow in the Results should be box and select the check box next to Clip Art.
In the Clip Art task pane, you can also
search for photographs, movies, and sounds. To include any of those media types,
select the check boxes next to them.
- Click Go.
- In the list of results, click the clip art to insert it.
Insert a picture from a Web page
- Open the Microsoft Office Word 2007 document.
- From the Web page, drag the picture that you want into the Word document.
Make sure the picture that you choose is not a link to
another Web page. If you drag a picture that is linked, it will be inserted in
your document as a link instead of an image.
Insert a linked picture from a Web page
- Open the Word document.
- On the Web page, right-click the picture you want, and then click Copy.
- In the Word document, right-click where you want to insert the picture, and then click Paste.
Insert a picture from a file
- Click where you want to insert the picture.
- On the Insert tab, in the Illustrations group, click Picture.

- Locate the picture that you want to insert.
- Double-click the picture that you want to insert.
Note By default, Microsoft Office
Word embeds
(embed: To insert information created in one program, such as a chart or an
equation, into another program. After the object is embedded, the information
becomes part of the document. Any changes you make to the object are reflected
in the document.) pictures in a document. You can reduce the
size of a file by linking
(link: Used to insert a copy of information created in one program into a
Microsoft Word document while maintaining a connection between the two files.
When the information changes in the source file, the changes are reflected in
the destination document.) to a picture. In the Insert Picture dialog box, click the arrow next to Insert, and then click Link to File.
Change an inline picture to a floating picture, and vice versa
An inline picture keeps its position relative to the text. A floating picture keeps its position relative to the page, and floats in that position as text flows around it.For example, if you choose to position the picture halfway down on the left side of the page with text wrapping, and then you add two paragraphs at the top of the page, the picture will stay exactly where you placed it — halfway down on the left side of the page.
To make sure that the picture stays with text that references it — for example, a description above the picture, position the picture as an inline picture. If you add two paragraphs above the description, the picture will move down the page along with the description.
- If the picture is not on a drawing canvas (drawing canvas: An area on which you can draw multiple shapes. Because the shapes are contained within the drawing canvas, they can be moved and resized as a unit.), select the picture. If the picture is on a drawing canvas, select the canvas.
- Under Picture Tools, on the Format tab, in the Arrange group, click Position.

If you don't see Position, click Arrange, and then click Position.
- Do one of the following:
- To change an inline (inline object: A graphic or other object that is positioned directly in the text of a Microsoft Word document at the insertion point.) picture to a floating (floating object: A graphic or other object that is inserted in the drawing layer so that you can position it precisely on the page or in front of or behind text or other objects.) picture, select the page position that you want.
- To change a floating picture to an inline picture, select In Line with Text
2. How to use Bullet and Numbering
Word 2007-2010
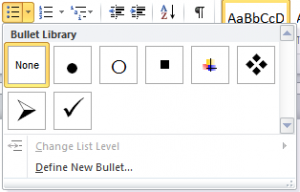
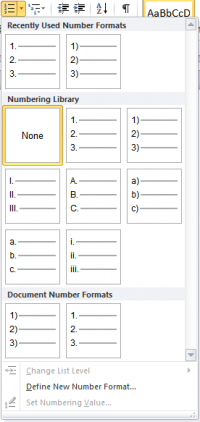
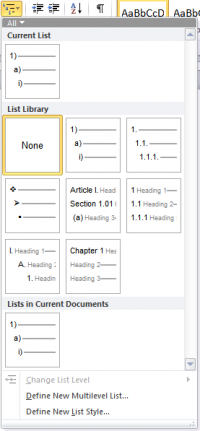
The Bullets & Numbering buttons in the ribbon-based versions of Microsoft Word are found in the Paragraph section of the Home tab. Each have a drop-down menu featuring the gallery of built-in choices (it will also show you ones you’ve used recently), as well as menu items for creating your own numbering scheme:3.How to Insert Symbol
Insert a symbol
- Click where you want to insert the symbol.
- On the Insert tab, in the Symbols group, click Symbol.
- Do one of the following:
- Click the symbol that you want in the drop-down list.
- If the symbol that you want to insert is not in the list, click More Symbols. In the Font box, click the font that you want, click the symbol that you want to insert, and then click Insert.
Note If you are using an expanded
font, such as Arial or Times New Roman, the Subset list appears.
Use this list to choose from an extended list of language characters, including
Greek and Russian (Cyrillic), if available.
Conclusion:
Microsoft word had more function such as creating symbol, numbering, bullet, and insert picture. Therefore, microsoft word are suitable for doing a job sheet, assignment, promotion paper, and folio. So, microsoft word are easy to used for all computer users.


